
Boundary and Initial Conditions
How to edit boundary conditions and initial conditions
USER-GUIDE
10/7/20252 min read

In tensorHVAC-Pro 2025, the boundary and initial conditions define how air enters, interacts, and behaves within the building model. These inputs set the environment for your simulation and help determine how air temperature and flow will evolve over time. The process is straightforward and designed to be accessible even for users without CFD experience.
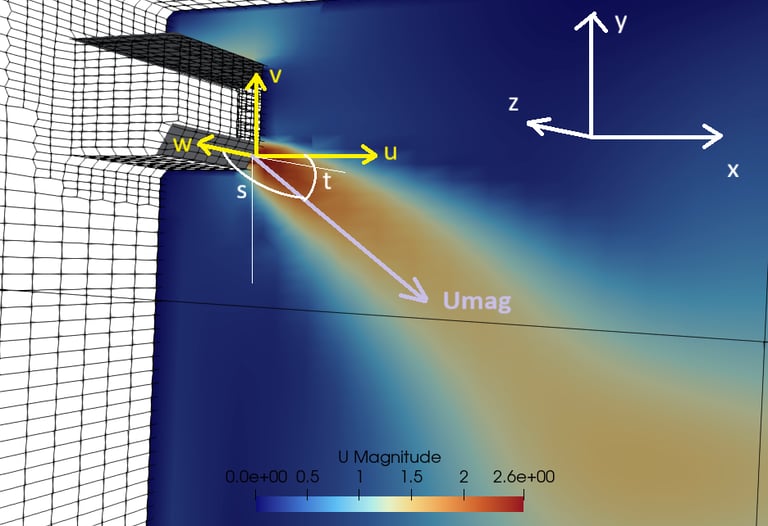
Each inlet represents a location where air enters the room. For every inlet, two types of information need to be defined: the air velocity and the air temperature. The air velocity is described by three components — u, v, and w — which represent movement in three directions: u for left and right (x-direction), v for forward and backward (y-direction), and w for upward and downward (z-direction). For example, if you enter “(0 -1 -2)”, that means the air moves backward at 1 meter per second and downward at 2 meters per second, with no motion left or right.
You can calculate it with:
u = Umag*cos(t)
v = Umag*sin(t)
w = Umag*sin(s)
Umag is velocity manitude, t is the vertical tilting angle, and s is side tilting angle
The temperature of the air entering through each inlet should be specified in Kelvin (K). If you have the temperature in Celsius or Fahrenheit, you can convert it using these formulas:
From Celsius to Kelvin: K = °C + 273.15
From Fahrenheit to Kelvin: K = (°F - 32) × 5/9 + 273.15.
For example, 27°C equals 300.15 K, and 77°F equals 298.15 K.
You can add or remove inlets depending on your setup. Clicking “+ inlet” adds a new inlet (for example, inlet_2), while “– inlet” removes one. This feature allows you to define multiple airflow entry points, such as several vents or diffusers within a room.
Objects represent heat sources or elements within the space that have a specific temperature, such as computers, lighting, or occupants. Each object only requires a temperature value in Kelvin. For instance, if you set object_1 to 308 K, it represents a surface or item with a temperature of 35°C. You can add more objects by pressing “+ object” or remove them using “– object.” This makes it easy to include several items that influence room temperature without needing to define complex physical properties.
Room surfaces, such as the floor, ceiling, and walls, can each be assigned a temperature. These values also need to be entered in Kelvin. For example, the floor might be slightly warmer at 302 K (29°C), while the ceiling could be set to 300 K (27°C). The wall temperature may vary depending on exposure to sunlight or insulation. These surface temperatures affect how air moves and mixes in the room.
The initial temperature defines the starting temperature of the air before any airflow occurs. It is usually assumed to be uniform throughout the room, meaning all air starts at the same temperature — for example, 300 K (27°C). The simulation then calculates how this initial state evolves once air starts moving and exchanging heat with the surroundings.
In summary, the process of setting boundary and initial conditions involves entering airflow direction and temperature at each inlet, defining heat-emitting objects, specifying wall, floor, and ceiling temperatures, and setting an initial temperature for the whole space. By adjusting these values, you can simulate realistic indoor air distribution and temperature behavior without dealing with the complexities of traditional CFD setup.
Back to user guide